Webflow Range Slider

A customizable and fully accessible range slider element for your Webflow forms. Supports one or two handles, and display value formatting.

Copy & Paste Elements

Range Slider One Handle

$ xxx
Copy
Thank you! Your submission has been received!
Oops! Something went wrong while submitting the form.

Range Slider Two Handles

0
5,000
Copy
Thank you! Your submission has been received!
Oops! Something went wrong while submitting the form.

Instructions

a. Copy & paste the Inputflow Library script
IMPORTANT: You only have to paste this once. If you have pasted this to your page before (because you used another element of the Inputflow Library) you do not need to add it again.
<script type="module" src="https://cdn.jsdelivr.net/gh/inputflow-tools/library@1/i.js"></script>
Copy Script
b. Add/modify the required attributes
MPORTANT: If you copied one of the elements above, the necessary attributes are already added. You can simply modify or change them as needed.

IMPORTANT: If you are uncertain about the structure of the elements, we recommend copying one of the elements from above and using it as a reference/starting point.
Range Slider Wrapper
I want this element to be the range slider wrapper
Attribute name
=
Attribute value

The range slider wrapper contains all elements of the range slider. Additionally, this is the element where you add settings attributes to modify the behavior of the range slider.

Min
This attribute sets the minimum value of the range slider
Attribute name
=
Attribute value

Add this settings attribute to the if-lib="rangeslider-wrapper" element.

Max
This attribute sets the maximum value of the range slider
Attribute name
=
Attribute value

Add this settings attribute to the if-lib="rangeslider-wrapper" element.

Stepsize
This attribute sets the step size
Attribute name
=
Attribute value

Add this settings attribute to the if-lib="rangeslider-wrapper" element.

Initial Value(s)
This attribute sets the initial value(s) of the range slider
Attribute name
=
Attribute value

Add this settings attribute to the if-lib="rangeslider-wrapper" element.

If your range slider has two handles, you can set two initial values by separating each value with a comma, e.g., if-lib-initialvalue="20, 50".

Format number
Format how the range slider values are displayed
Attribute name
=
Attribute value

This attribute is optional

Add this settings attribute to the if-lib="rangeslider-wrapper" element.

If this value is set to "true" then the values displayed in all elements with if-lib="rangeslider-value-display" will be formatted.

The format is chosen based on the website visitor's language settings in their browser. If you want to specify the number format, you can also enter a country code, e.g., if-lib-format-number="en_US".

Format input
Also format the input values
Attribute name
=
Attribute value

This attribute is optional

Add this settings attribute to the if-lib="rangeslider-wrapper" element.

If this attribute is set to "true," then all formatting options applied to the display values will also be applied to the input values. This means the formatted values will be included in the form submission instead of the non-formatted values.

This only works if the input elements of the range slider are of type "Plain" (text).
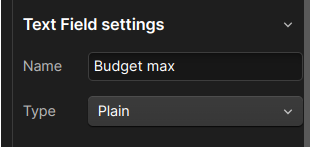
If the input is of type "Number", then this setting does not have an effect.

Format function
Custom Javascript function to format the number
Attribute name
=
Attribute value

This attribute is optional

Add this settings attribute to the if-lib="rangeslider-wrapper" element.

Use a custom JavaScript function to format the display values. This JavaScript function must be globally defined so that the Inputflow Library has access to it.

The function must take a number as a parameter, and return a string.

For the above example (if-lib-format-function="toRoman"), you could add the following code to your page body to achieve a Roman numeral slider:

<script>
// This function converts a number to a roman number
function toRoman(num) {
  num = Math.round(num)
  if (!num) return "0"
  const numerals = [
    { value: 1000, numeral: 'M' },
    { value: 900, numeral: 'CM' },
    { value: 500, numeral: 'D' },
    { value: 400, numeral: 'CD' },
    { value: 100, numeral: 'C' },
    { value: 90, numeral: 'XC' },
    { value: 50, numeral: 'L' },
    { value: 40, numeral: 'XL' },
    { value: 10, numeral: 'X' },
    { value: 9, numeral: 'IX' },
    { value: 5, numeral: 'V' },
    { value: 4, numeral: 'IV' },
    { value: 1, numeral: 'I' }
  ];

  let roman = '';
  for (let i = 0; i < numerals.length; i++) {
    while (num >= numerals[i].value) {
      roman += numerals[i].numeral;
      num -= numerals[i].value;
    }
  }
  return roman;
}
</script>
Update behavior
Configure the update behavior of the inputs
Attribute name
=
Attribute value

This attribute is optional

Add this settings attribute to the if-lib="rangeslider-wrapper" element.

By default, the rangeslider updates input values only when the handle is released.

Setting this attribute to "move" will update the values while dragging the handle. However, be aware that if other JavaScript functionalities are triggered by input value changes, setting this to "move" might cause performance issues.

Important: This setting only applies to the hidden input values of the range slider. The display values, which are visible to the user, always update instantly, regardless of whether the update behavior is set to "move" or "release".

Important: If you are unsure whether you need this setting, you most likely do not need it.

Range Slider Track
I want this element to be the range slider track
Attribute name
=
Attribute value

This element must be nested inside the if-lib="rangeslider-wrapper" element.

Range Slider Track Fill
I want this element to be the range slider fill
Attribute name
=
Attribute value

This element must be nested inside the if-lib="rangeslider-track" element.

Range Slider Handle
I want this element to be the range slider handle
Attribute name
=
Attribute value

This element must be nested inside the if-lib="rangeslider-track" element.

Range Slider Value Display
I want this element to display the range slider value(s)
Attribute name
=
Attribute value

This element must be nested inside the if-lib="rangeslider-wrapper" element.

It will display the formatted value(s) of the range slider.

Target value
This attribute determines which value to display
Attribute name
=
Attribute value

This attribute is optional

This settings attribute only affects range sliders with two handles/values. Add this settings attribute to the if-lib="rangeslider-value-display" element.

If you set this attribute's value to "high-value", the element will display the higher of the two handle values. If you set it to "low-value", it will display the lower/smaller value of the range slider.

If you do not use this attribute, then by default:

  • The first element with the attribute if-lib="rangeslider-value-display" will display the low value.
  • The second element with the attribute if-lib="rangeslider-value-display" will display the high value.
Range Slider Input
I want this element to be the range slider input
Attribute name
=
Attribute value

This element must be nested inside the if-lib="rangeslider-wrapper" element

This input element will store the value, which is sent with the form submission. You can have one or two input elements (depending on the number of handles your range slider has).

The input elements should be hidden from the website visitor and set to display: none.

Accessibility

Screen Reader
The slider component uses slider role on the handle in addition to the aria-valuemin, aria-valuemax, aria-valuenow and aria-label attributes.

Keyboard Support

The following keyboard controls are availble for this component:
Key
Function
tab
Moves focus to the (next) slider handle
shift + tab
Moves focus to the (previous) slider handle
right arrow
up arrow
Increments the value (increment depends on the step size)
left arrow
down arrow
Decrements the value (decrement depends on the step size)
home
pos1
Sets the slider value to the minimum value
end
Sets the slider value to the maximum value
page up
Increments the value by 10 steps
page down
Decrements the value by 10 steps

Frequent Questions

Is Inputflow free to use?

Inputflow has an unlimited free trial version, which you can use on your .webflow.io domains completely for free.

The idea is, that you can test out Inputflow with all its features, as long as you want, to see if it is a good fit for your project requirements.

Only once you want to use Inputflow on a custom domain, we ask you to upgrade to a paid plan.

I want to build XYZ. Can Inputflow do this?

If you are not sure, whether Inputflow covers your use-case or not, send your project details to [email protected] and we'll respond with a Loom video within 24 hours.

Where can I learn more about how Inputflow works?

We recommend that you check out the documentation, the 2-minute quick-start guide, and the video tutorial.

Can I really get my money back for any reason?

Yes. Any reason. We won't even ask why. Everyone on our team has done freelance or agency work in the past, so we get it. Whatever your reason, contact us within 30 days after your purchase and we'll give you a full refund, no questions asked.

Can I use Inputflow on client sites?

Yes, you can use it on your client projects or your own projects.

I have a problem and I need help!

Send an email to [email protected]. Include the following: a read-only link and the link to the live website where the form is displayed. We take support very seriously and will make sure to resolve your issue quickly.

What if I exceed my submission limit? Will my form stop working?

Your forms will continue to work. We are definitely not shutting down your forms just because you get a lot of unexpected submissions. We will send you a friendly email, that it is time to upgrade to a higher plan.

Does Inputflow work with Wordpress?

No. Inputflow only works with Webflow.

How are submissions counted?

Whenever a form that you built with Inputflow is submitted, it counts as one submission. Submissions are counted at the account level. For example, if you have four different websites that each receive 200 submissions per month through Inputflow forms connected with your account, this counts as 800 submissions (4 * 200).

Does Inputflow bypass the Webflow submission limit?

Not by default. Every Inputflow form is a Webflow form. This means that when an Inputflow form is submitted, a standard Webflow form submission occurs in the background. This would count as one Inputflow submission and one Webflow submission.

However, with Inputflow, you have the option to submit your forms to custom webhooks (e.g., Zapier, Make, etc.). In that case, no native Webflow submission occurs, and it counts as only one Inputflow submission.

Start building your own multi-step form!

By clicking the button down below, you can start the form editor, and create a beautiful muli-step form in Webflow!
Install Webflow App